
Introduction:
Indulge in the zesty goodness of a homemade creamy lemon cheesecake. This dessert combines a buttery biscuit crust, a rich and smooth lemon-flavored filling, and a luscious lemon glaze that will tantalize your taste buds. Whether you’re celebrating a special occasion or craving a sweet treat, this recipe is sure to impress.
A Dessert That Combines Creaminess with a Zesty Twist
If you’re a fan of indulgent, velvety desserts with a refreshing citrus kick, this creamy lemon cheesecake is about to become your new favorite treat. Combining the buttery richness of a biscuit crust with the smooth, tangy lemon filling and a glossy lemon glaze, this cheesecake is the ultimate dessert for any occasion. Whether you’re preparing a sweet surprise for a loved one’s birthday, hosting a dinner party, or simply treating yourself after a long day, this recipe is designed to deliver a perfect balance of creamy texture and bright lemony flavor.
The Magic of Homemade Cheesecake
There’s something uniquely satisfying about making cheesecake from scratch. Not only do you control the quality of ingredients, but you also get to experience the joy of watching simple elements transform into an impressive, bakery-worthy dessert. This creamy lemon cheesecake is no exception. Each bite offers a harmonious blend of smooth, melt-in-your-mouth filling paired with the crumbly, buttery base. Topped with a homemade lemon glaze, it adds a burst of citrus brightness that perfectly complements the richness beneath.
Why Lemon Cheesecake Stands Out
While classic cheesecakes are beloved for their creamy decadence, adding lemon takes things to a whole new level. Lemon cuts through the richness, offering a refreshing balance that keeps each bite from feeling too heavy. Plus, the lemon glaze on top enhances the overall presentation—making this cheesecake not only delicious but visually stunning. Whether you’re a seasoned baker or a beginner looking to impress, this recipe is simple enough to follow while still delivering a dessert that looks and tastes professionally made.
Perfect for Any Occasion
One of the best things about this creamy lemon cheesecake is its versatility. It fits seamlessly into any celebration or casual gathering. Imagine serving slices of this dessert after a family dinner, or offering it as the star attraction at a holiday feast. It’s equally suited to formal occasions and cozy nights at home. Plus, the zesty lemon flavor makes it a refreshing choice year-round—perfect for warm summer evenings or as a bright note during colder months.
Simple Ingredients, Extraordinary Flavor
Despite its luxurious taste, this cheesecake relies on simple pantry staples. With everyday ingredients like biscuits, butter, powdered milk, and fresh lemons, you can create a dessert that feels indulgent without requiring a trip to a specialty store. The fresh lemon juice and zest are key to delivering an authentic citrus punch, while the creamy filling and smooth glaze elevate the entire experience.
A Foolproof Recipe for Success
Even if you’ve never baked a cheesecake before, this recipe is designed to guide you through the process with ease. From preparing the crust to crafting the silky filling and perfecting the lemon glaze, each step is clearly outlined to ensure success. You’ll also find useful tips on how to avoid common cheesecake mistakes, like cracking or sinking, ensuring that your dessert turns out perfectly every time.
What to Expect from This Recipe
By following this recipe, you’ll achieve a cheesecake that boasts a buttery, crumbly crust as the foundation. The filling will be smooth and creamy, with a delicate tang from the lemon juice and zest. The final touch—a glossy, homemade lemon glaze—adds both flavor and a beautiful finish that makes this dessert as delightful to look at as it is to eat. Plus, the cheesecake can be made in advance, making it a convenient choice for entertaining.
A Rewarding Baking Experience
Baking this creamy lemon cheesecake isn’t just about creating a delicious dessert—it’s about the joy of crafting something with care and sharing it with others. The process of blending ingredients, layering textures, and watching it all come together is deeply satisfying. And when you serve a slice to family and friends, the look of delight on their faces will make every step worth it.
So, are you ready to create a dessert that’s sure to become a household favorite? Gather your ingredients, preheat your oven, and let’s dive into this delectable creamy lemon cheesecake recipe.
Why You’ll Love This Creamy Lemon Cheesecake
- Burst of Lemon Flavor: Fresh lemon juice and zest give a refreshing tang.
- Silky Smooth Texture: Creamy filling with a velvety finish.
- Perfect for Any Occasion: Ideal for gatherings, birthdays, or a weekend treat.
Ingredients for Creamy Lemon Cheesecake
Before you get started, let’s gather all the necessary ingredients for your creamy lemon cheesecake. The best part? You likely already have most of these simple staples in your kitchen!
| Layer | Ingredients |
|---|---|
| Crust | 180 g biscuits, 100 g melted butter |
| Cheesecake | 120 g powdered milk, 100 ml hot water, 100 g butter (room temperature), 120 ml lemon juice, zest of 2 lemons |
| Lemon Glaze | 100 g sugar, 2 egg yolks, 2 tbsp starch, 2 tbsp sugar, 1 cup lemon juice, 500 ml milk, vanilla extract |
| Decoration | Lemon slices, grated lemon zest, mint leaves |
How to Make Creamy Lemon Cheesecake
Step 1: Prepare the Biscuit Crust
- Blend the biscuits into fine crumbs with a food processor or crush them using a rolling pin.
- Combine the biscuit crumbs with melted butter until the texture resembles wet sand.
- Press the mixture firmly into the base of a springform pan, ensuring an even layer.
- Refrigerate for 20 minutes to allow it to set.
Step 2: Make the Creamy Lemon Filling
- Mix hot water, powdered milk, and sugar in an electric mixer until smooth and creamy.
- Add softened butter and continue beating until fully incorporated.
- Pour in the fresh lemon juice and grated lemon zest, blending until you achieve a silky, lump-free mixture.
- Spread the lemon filling evenly over the chilled crust and smooth the surface.
Step 3: Create the Lemon Glaze
- Whisk together lemon juice, egg yolks, sugar, cornstarch, and a splash of vanilla extract in a bowl.
- Gradually add the mixture to a saucepan with milk, stirring constantly.
- Cook over medium heat, stirring continuously until the glaze thickens to a smooth, pourable consistency.
- Let the glaze cool slightly before gently pouring it over the cheesecake layer.
Step 4: Chill, Decorate, and Serve
- Refrigerate the cheesecake for at least 6 hours—overnight for the best results—to allow it to fully set.
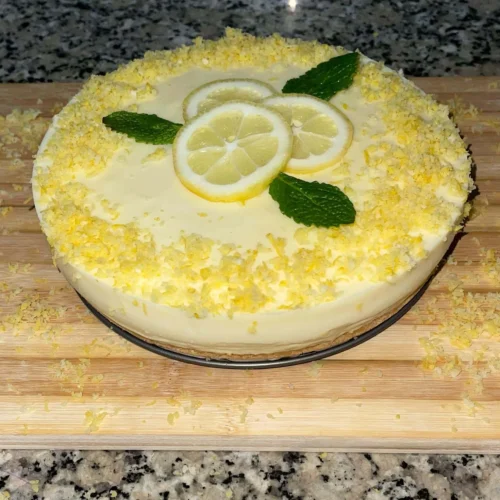
- Before serving, garnish with fresh lemon slices, a sprinkle of lemon zest, and a few mint leaves for a vibrant touch.
Enjoy every bite of this luscious, creamy lemon cheesecake—perfect for any occasion! 🍋✨
Nutritional Information (Per Serving)
This creamy lemon cheesecake is not only indulgent but also offers a satisfying blend of creamy textures and zesty flavors. Here’s a breakdown of the nutrition in one serving:
| Nutrient | Amount |
| Calories | 380 kcal |
| Total Fat | 22 g |
| Carbohydrates | 40 g |
| Protein | 7 g |
| Sugar | 28 g |
| Fiber | 1 g |
Nutritional Information (Per Ingredient)
Here’s a breakdown of the nutritional value of each key ingredient in your creamy lemon cheesecake. This helps you understand exactly what goes into each delicious bite.
| Ingredient | Calories (kcal) | Total Fat (g) | Carbohydrates (g) | Protein (g) | Key Benefits |
|---|---|---|---|---|---|
| Biscuits (180 g) | 860 | 36 | 120 | 12 | Provides a crunchy, buttery base |
| Butter (100 g) | 717 | 81 | 0 | 1 | Adds rich, creamy texture |
| Powdered Milk (120 g) | 628 | 34 | 46 | 32 | Source of calcium and protein |
| Lemon Juice (1 cup) | 61 | 0 | 21 | 1 | Provides a refreshing citrus tang |
| Sugar (100 g) | 387 | 0 | 100 | 0 | Sweetens the cheesecake |
| Egg Yolks (2) | 110 | 10 | 1 | 6 | Enhances richness and texture |
| Starch (2 tbsp) | 60 | 0 | 14 | 0 | Helps thicken the lemon glaze |
| Milk (500 ml) | 310 | 17 | 24 | 16 | Contributes to a smooth filling |
Tips for the Perfect Creamy Lemon Cheesecake
- Room Temperature Ingredients: Ensure butter is soft for a smooth filling.
- Chill Thoroughly: Allow time for the cheesecake to set properly.
- Fresh Lemon Juice: Use fresh lemons for a more vibrant flavor.
Frequently Asked Questions About Creamy lemon cheesecake
How Long Can I Store Lemon Cheesecake?
You can store lemon cheesecake in the refrigerator for up to 5 days in an airtight container.
Can I Freeze This Cheesecake?
Yes! Secure the cheesecake in a tight layer of plastic wrap and store it in the freezer for up to 2 months.
What Biscuits Work Best for the Crust?
Digestive biscuits, graham crackers, or shortbread cookies all work perfectly.
How Do I Avoid Cracks in My Cheesecake?
Ensure ingredients are well combined and the cheesecake is chilled slowly to prevent cracks.
Conclusion
This creamy lemon cheesecake is the ultimate dessert for citrus lovers. Its rich, tangy, and refreshing taste makes it a crowd-pleaser. Follow the steps carefully, and you’ll have a delightful treat ready to impress your family and friends. Enjoy every creamy, lemony bite!
Ready to try it? Gather your ingredients and start baking this sensational cheesecake today!
Call to Action:
Craving a dessert that’s rich, creamy, and bursting with zesty goodness? Try this homemade Creamy Lemon Cheesecake and elevate your dessert game! Perfect for any occasion – let’s get baking! 🍋🍰
Creamy Lemon Cheesecake Recipe – Easy & Delicious
Equipment
- Springform pan (9-inch)
- Electric mixer
- Mixing bowls
- Food processor (or rolling pin)
- Saucepan
- Spatula
Ingredients
- For the Biscuit Crust:
- 180 g biscuits graham crackers or digestive biscuits
- 100 g unsalted butter melted
- For the Creamy Lemon Filling:
- 120 g powdered milk
- 100 ml hot water
- 100 g unsalted butter softened
- 120 ml fresh lemon juice
- Zest of 2 lemons
- 100 g sugar
- For the Lemon Glaze:
- 100 g sugar
- 2 egg yolks
- 2 tbsp cornstarch
- 1 cup fresh lemon juice
- 500 ml milk
- 1 tsp vanilla extract
- For Decoration:
- Lemon slices
- Grated lemon zest
- Fresh mint leaves
Instructions
- Step 1: Make the Biscuit CrustCrush the biscuits into fine crumbs using a food processor or by placing them in a sealed bag and using a rolling pin.Combine the crushed biscuits with melted butter, stirring until the mixture is thoroughly blended.Press the mixture firmly into the base of a 9-inch springform pan to form an even layer.Refrigerate the crust for 20 minutes to set.
- Step 2: Prepare the Creamy Lemon FillingIn a mixing bowl, combine hot water and powdered milk. Stir until smooth.Using an electric mixer, blend the powdered milk mixture with sugar and softened butter until creamy.Add the lemon juice and lemon zest, mixing until fully combined and smooth.Pour the lemon filling over the chilled biscuit crust, spreading it evenly with a spatula.Return to the refrigerator while preparing the glaze.
- Step 3: Create the Lemon GlazeIn a bowl, whisk together lemon juice, egg yolks, sugar, cornstarch, and vanilla extract.Warm the milk in a saucepan over medium heat, ensuring it doesn't reach a boil.Gradually add the lemon mixture to the warm milk, stirring constantly.Continue cooking until the glaze thickens into a smooth, pourable consistency.Let the glaze cool slightly, then gently pour it over the cheesecake layer.
- Step 4: Chill, Decorate, and ServeCover the cheesecake with plastic wrap and refrigerate for at least 6 hours (or overnight for best results).Before serving, garnish with lemon slices, grated lemon zest, and fresh mint leaves.Slice and enjoy the creamy, zesty goodness!
Notes
- Room Temperature Ingredients: Ensure butter is softened and other ingredients are at room temperature for the smoothest filling.
- Chill Thoroughly: Allow ample chilling time to ensure the cheesecake sets properly and slices cleanly.
- Fresh Lemon Juice: Always use fresh lemons for the most vibrant flavor.
- Storage: Store leftover cheesecake in an airtight container in the refrigerator for up to 5 days or freeze for up to 2 months.
- Prevent Cracks: Avoid overmixing the filling and allow gradual cooling to prevent surface cracks.